We use cookies and similar technologies on our digital services. Some are essential for their operation, while others help us understand usage patterns to ensure quality and enhance the user experience. With your consent, we may also use cookies to optimize advertising. Click 'Manage Cookie Preferences' to adjust your settings.
Quality solar installations start with a well-planned
design and are executed by certified tradespeople who
take pride in their work.
The small details make a big difference. Clean bends,
skilled wire management, razor-sharp edges,
intentional planning, and keeping and leaving a
clean jobsite are the hallmarks of good contracting.
Everyone is selling similar products at similar prices. What is the difference?
Quality work is touted by everyone, but only delivered by some. This guide is meant to shed light on what quality solar installations actually are and what to look for.
Rooftop solar in Canada isn't unregulated. The National Building Code, the Canadian Electrical Code and CSA Group all set out how a system should be designed, attached and wired. The catch is that most of that guidance was written for engineers and inspectors, not homeowners, and building authorities apply it differently from one municipality to the next. That inconsistency is exactly why it's worth knowing what good practice looks like on your own roof.
Really bad work is obvious to everyone, but subpar work often floats under the radar, especially to homeowners who don’t know what to look for.
The difference between a good solar installation and a poor one is decided on your roof, after you've signed: how each attachment is sealed, where the wiring runs, how carefully the electrical work is finished, and what the crew leaves behind. Most of it you'll never see up close, which is exactly why it's worth knowing what to look for.
Trusses, Roof Penetrations, Weatherproofing, and Sealing
Home solar installations will require dozens of penetrations into your roof to secure the racking. If done wrong, you might not find out for 10 years. If the “affordable” solar contractor isn’t still around, you might be left with holding a sizable bag.
Roofing Attachment Types
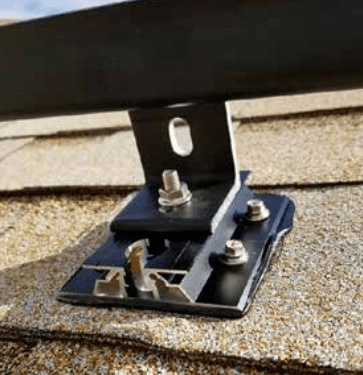
Kuby uses the Roof Tech RT Mini-II attachment for shingle roofs. This product uses a proprietary butyl sealing putty (AlphaSeal) on the bottom to stop moisture from reaching the roof penetrations. This product is ICC certified as a flexible flashing under ESR-3575 and is rated for 180mph winds, 90psf ground snow loading, and -40 to +90 degrees C.
This versatile attachment is suitable for various roofing materials, but not all. The correct roofing attachment should be selected for the appropriate roofing material.
Standing seam metal roofs can often be completed by using S-5! Attachments or similar products that do not require any roof penetrations, although RT Mini-II is still suitable for many metal roofs.
Clay tile roofs are one of the more difficult roofs to install on. Many installers are not skilled enough to take on this degree of difficulty.
Attachment Methods
The attachments may penetrate the trusses directly, attach to the sheathing, or attach onto scabbed members fastened to the truss. Each has their advantage.
Attaching to the trusses is an acceptable method that is very secure. This is common practice in Canada.
Attaching to the roof sheathing alone can be done in select circumstances, but may require more penetrations to achieve the same uplift resistance. The sheathing attachment method also relies on the quality and thickness of the sheathing which may be unknown or compromised. If a sheathing attachment is required, it is recommended to have structural engineers certification.
Attaching to scabbed members of trusses is recommended by the [file-download text='Truss Plate Institute of Canada' link='https://cdn.prod.website-files.com/66633c4e7859db4b14a03f7d/6ace850cae3aea7a4df2fea6_technical_bulletin_no7_20120312.pdf' file_name='Attaching to scabbed members of trusses'], but is generally not required by most structural engineers.
Attaching to the truss, sheathing, or scabbed members can all be done in a high-quality and code-compliant manner.
Roof Inspection
Prior to installing solar projects, Kuby inspects the roof and trusses to make sure both are suitable for a new solar installation.
Reviewing the trusses and attic space prior to installing solar is a critical step. In many circumstances, a structural engineer may be required to certify the solar installation is safe for the building. Older buildings (built before 1990), damaged trusses, custom roof work, or water stains are all signs that structural engineering may be required.
If you need a new roof within 10 years, we recommend replacing it first.
There are shingle treatment sprays available which may prolong their life. The applicability and efficacy of such sprays depends on the roofing condition; they are not a fix for any roof.
We are not here just to sell you solar - if the best thing for you is to replace your roof in 3 years, we will let you know and reach out when the time is right.
Weatherproofing and Sealing
Beyond the manufacturer-certified flashing, Kuby adds an additional layer of roofing caulking around the sides and top of each flashing to provide an added layer of protection.
Additional roof penetrations may be required for junction boxes to feed cables into the attic space. It is important that each of these be installed as per manufacturer recommendations and sealed with additional caulking.
Getting Wires Off the Roof and Out Of Sight
This is where the good, the bad, and the ugly really shine.
Installing solar requires running one or more cables from the roof down to your electrical panel. Sometimes connecting multiple roof faces is necessary too.
How your installer runs these cables speaks volumes about whether they are a quality contractor or not.
Inter-Roof Connections
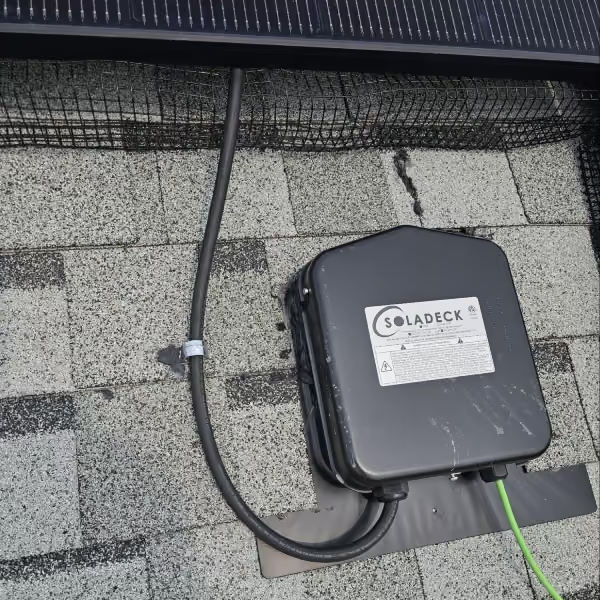
Kuby uses a purpose-built flashed roof penetration, SolaDeck. The product has a flashing that slides underneath shingles to allow water to wick around the penetrations. The flashing is part of the enclosure so the penetration can’t be done wrong. The flashing has a V-shapes design to ease run-off, weep holes for condensation, and is certified to UL 1741, Nema 3R, and CSA C22.2 No. 290.
Kuby uses SolaDecks to interconnect every roof face to one another, with all cabling hidden in the attic. This is more work, but looks better than having lots of visible cabling spanning from one roof face to another.
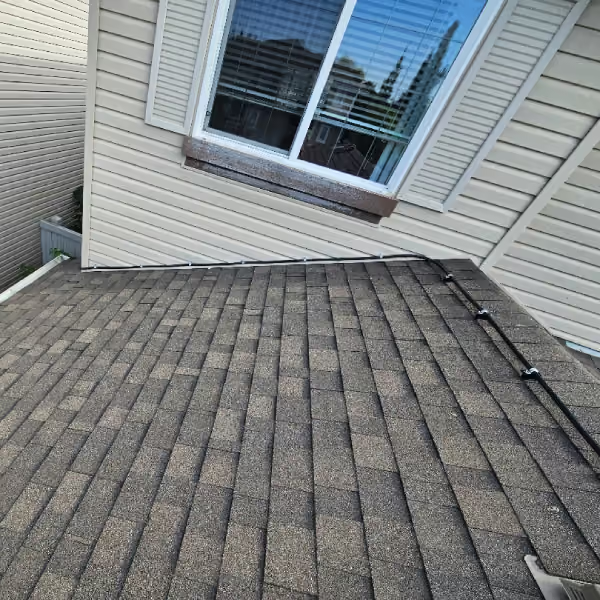
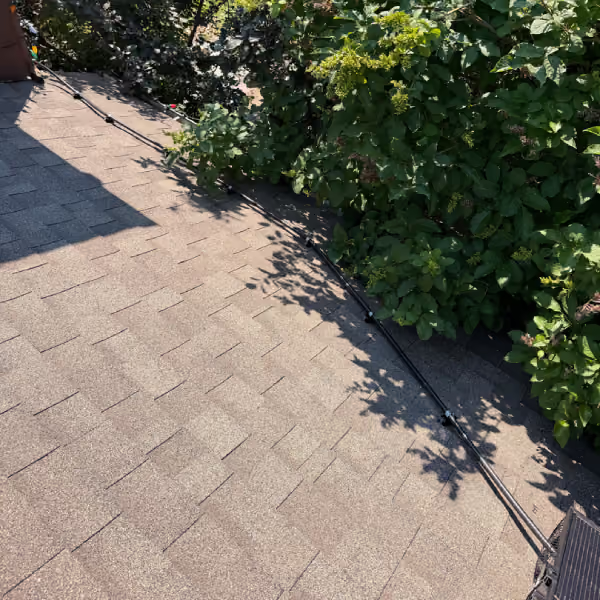
If cables absolutely must run on the roof (they rarely do), they should be secured with a weatherproof attachment, not just drilled into the roof with a dab of caulking.
Can you see the cables connecting one roof face to another? Neither can we.
Home Runs To Match Your Home
The cables have to get from the roof down to your electrical panel somehow. This is called the “home run”.
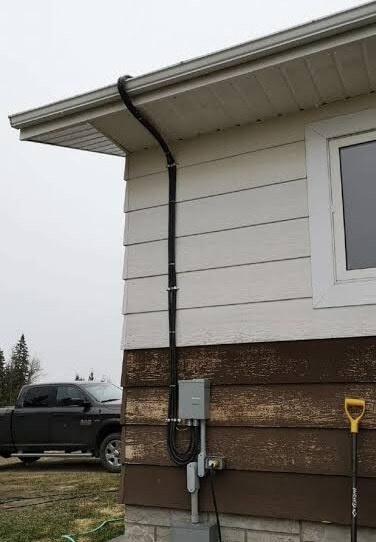
Cheap solar contractors will run cabling overtop of your eavestrough and down the side of your house wherever your meter/electrical panel is located. This practice is visible from the street and looks ugly. It is done only because it is faster and saves the contractor a few bucks.
Kuby avoids this practice by running cables from the attic through interior cavities if available, or penetrating out the bottom of the soffit from the attic if there is no interior cavity. Once again, this is more work, but it's worth it for a clean product.
There should be no cabling over the eavestrough.
The home run should also run somewhere discreet - on the side of your house, behind a bump-out - and follow natural textures or materials of your house.
When you look at the house from your primary front or back yard viewscapes, you should not see a bunch of cabling.
What not to do:
The Good, The Bad, and The Ugly
GOOD SOLAR
(Installed by Kuby)
Description
BAD SOLAR
(Installed by others; fixed by Kuby)
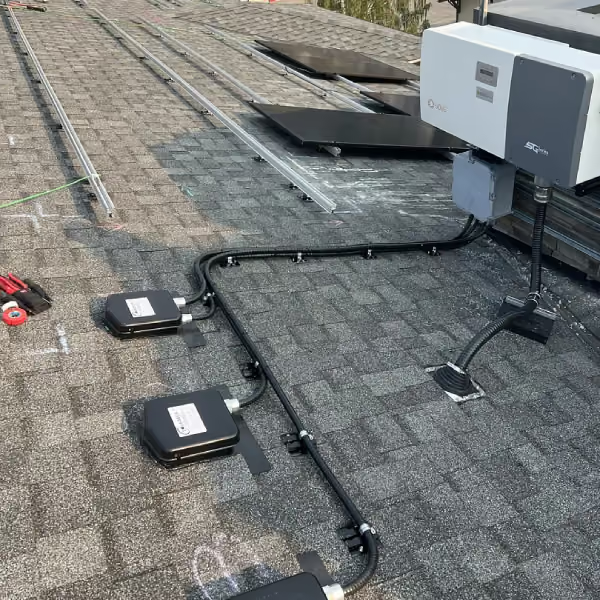
Wires not at 90 degrees and a wall
penetration without a junction box.
Exterior cable running across the
roof (if necessary).
No visible cables from one roof to
the other. No excess cabling between
rows separated by a gap.
We elected not to copy and paste
images publicly posted by competitors.
There are countless examples of
contractors showcasing sloppy
workmanship.
SolaDeck junction box with unsupported
cable, and roof attachment that will
not last 30 years.
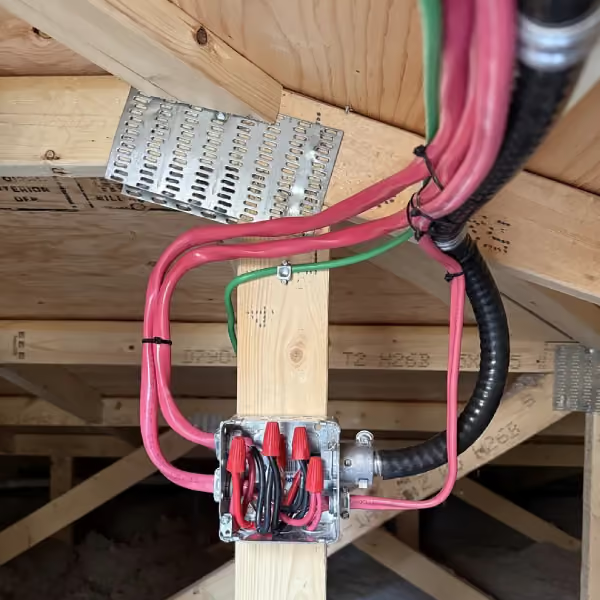
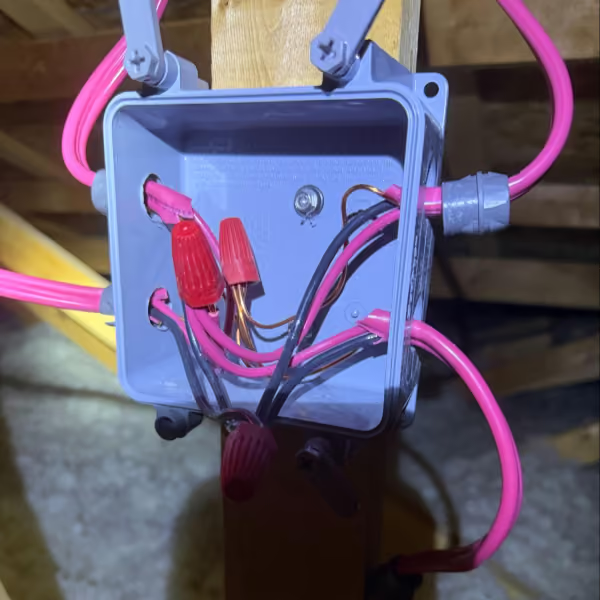
Junction box with loose connectors,
short cables, and haphazard splices.
Master Workmanship
The parts most people rarely see are where corners get cut the most.
Quality is the byproduct of tradespeople who take pride in their work and want to do a good job. Whether its visible to the public or only to electricians.
Certified Tradespeople
Cheap contractors often use cheap labour or non-certified workers to save a buck. All Kuby staff are certified electricians as is required to perform electrical work in Canada.
Cheap contractors will often make work in an attic ugly or even worse, not code-compliant, because it won’t be seen by that many people. This poor attitude will spill over into all aspects of the installation leaving homeowners with a subpar product.
Safe Work
We have all driven by worksites and seen people on the roof not tied-off. This is a major WCB infraction and a big red flag.
Being tied-off is mandatory for work sites above 3m (which is pretty much every roof).
Kuby maintains a Certificate of Recognition (COR) for safety practices. This certification is only achieved by having an in-depth safety program that is audited by a third part every year.
Beyond that, you contractor should carry at least $5,000,000 in general liability insurance just in case.
Electrical Components
Conduits should be straight, evenly supported, and parallel to roof lines and building edges. Never crooked. Supporting straps should be evenly spaced.
Solar panels should be mounted flush to one another with even, 90 degree lines. The layout should be aesthetically pleasing.
Cable terminations should be cut to the proper length, and torqued according to manufacturer specifications. Under torquing will result in arcs or fires. Over-torquing may result in damaged cables, damaged terminals, and faster degradation.
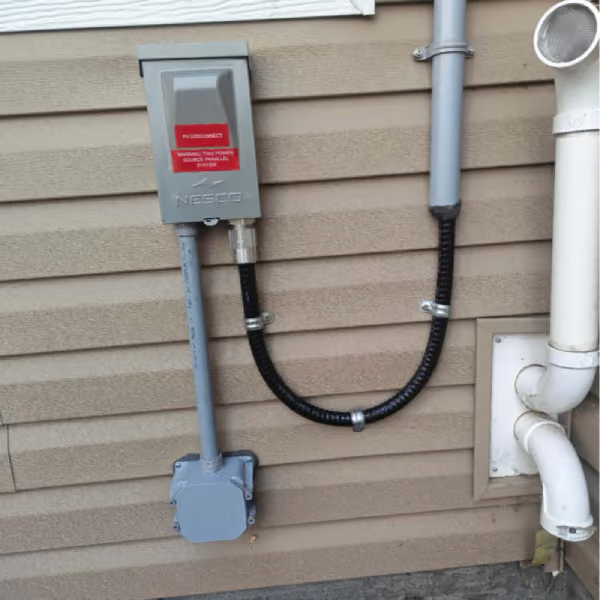
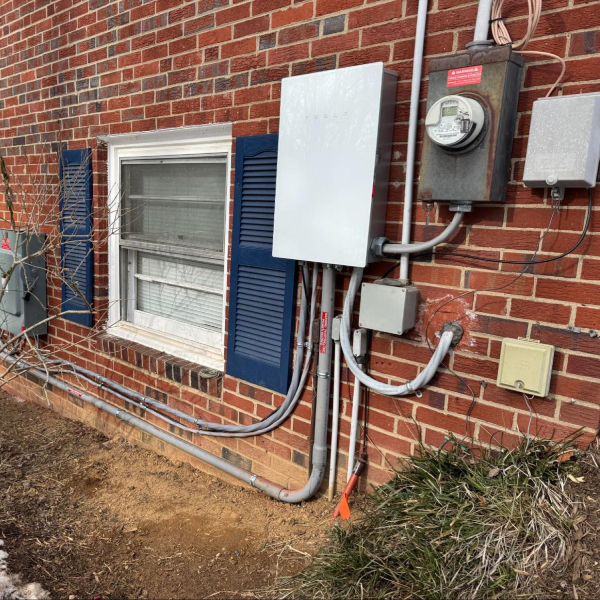
Cables should be brought from the exterior to the interior of a house using a junction box. A black teck cable stuffed into a hole and filled with caulking is not best practice.
Electrical panel wiring should have straight lines, 90 degree bends, and not too much or too little length in the wires.
There should be no visible cable loops underneath the array. And especially not touching the roof. All cables should be tightly wrapped against the racking or panels.
Solar connectors should only ever be joined to their certified mating pair, because mismatched connectors are a known source of failures. Wiring should be supported and protected, insulation tested, every connection tightened to specification, and every label applied as the Canadian Electrical Code and your utility require. None of it is visible once the array is on, which is why the process matters more than the promise.
Complete System
The system should be installed after an electrical permit is approved and should be inspected by the Authority Having Jurisdiction after the installation is completed. Permits are non-negotiable.
Once the array is installed, the extra racking should be cut so that no more than 1-2 inches is sticking out beyond the array. Even this practice can be taken a step further.
The cleanest installations use ‘Hidden End Clamps’ and negate any racking from sticking out beyond the panels.
A great install is one where you can tell the crew actually thought about the job before they started. Equipment should be laid out in a way that makes sense and is visually appealing. Conduit and cables are evenly spaced and run in congruent lines. Modules and racking are straight. The job is intentional.
The small details are the big details. Clean bends, clean wire management, and a clean job site.
Does your electrical panel look like this?
Racking and Array Layout
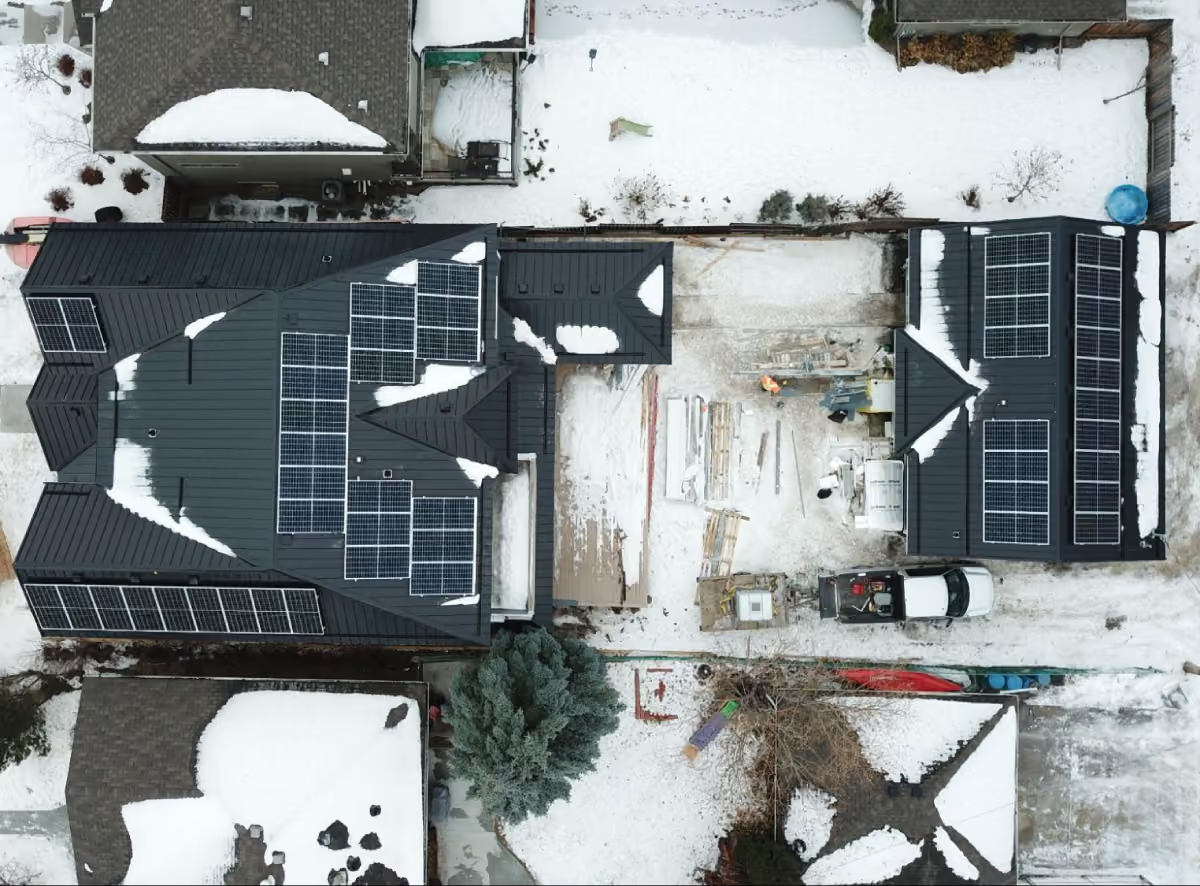
Matching the array to your roof shape is where art meets skill. The system not only has to work electrically, but should (ideally) look good and fit your roof shape.
Intentional Layouts
Panels poking over roof hips or beyond roof edges is low quality. Beyond looking ugly, protruding panels come with increased wind loading concerns.
Pushing panels too close to roof edges will mean a much more dangerous installation and future maintenance.
Covering every square inch of a roof is a red flag. There should be adequate space around the array to safely access parts for maintenance as well as complete the installation.
Pushing panels too close to the eavestrough may result in extremely dangerous snow avalanches, or precipitation run-off that can eat away at your foundation over 15+ years.
Cheap contractors may not consider long-term consequences 15+ years away. Our role as a quality contractor is to let you know the real risks and consequences of certain actions, not to try and make an extra buck by selling you 2 more panels that will do more harm than good in the long run.
Solar modules are designed to only be clamped in certain locations. For most solar panels the clamp zone is approximately ¼ of the length of the module relative to the short side. Clamping outside of this zone will void the warranty and is a sign of a poor installation.
Many modules on the market today are larger format than standard models from 5-10 year ago. The larger modules often only allow clamping on the long side of the panel. This means that modules in landscape orientation cannot have racking that runs left and right across the roof, but rather must have racking that runs up and down the slope of the roof.
Considering the short-side clamping allowability of the selected module is an important part of the design process that is often overlooked.
Engineered Design
How many attachments your system needs depends on your truss configuration, array size/layout, and location.
It is paramount that solar PV systems are engineered to withstand uplift forces from local wind loads. It is just as important to ensure the structure is adequately designed to withstand the new dead and live loads from the solar PV system.
Snow on a solar array doesn't behave like snow on a bare roof. Panels tend to shed snow faster, but while it's there, the weight must be considered. Since 2020, the National Building Code of Canada has included specific snow and wind provisions for roofs with solar panels. A good design should name the loads it was checked against.
Windy regions such as Lethbridge and Pincher Creek will need more attachments relative to Edmonton or Calgary. It is critical that your contractor considered regional differences, designs accordingly, and if necessary completes thorough structural engineering.
Cheap installs may cut costs here by using generic racking and attachment spacings for every region.
Certain regions require structural engineering and/or electrical engineering certifications. Kuby’s engineers perform these evaluations for you to confidently rely on the system to operate according to building and electrical code requirements.
A solar contractor that is also an engineering firm will be more likely to perform enhanced due diligence to ensure your system is safely designed and installed.
How will you know it's working?
Systems can fail quietly. Most homeowners find out months later when they remember to check their app or when they notice their power bills are too high.
System Commissioning
Commissioning is more than flipping a switch.
Before your crew leaves, the system should be tested to verify that it is working properly. They will probably not be allowed to leave it turned on depending on the interconnection and inspection process.
The monitoring system should be configured during or shortly after the installation. This is what lets you see your system production.
A thorough commissioning confirms the attachments and roof entries are weatherproof, checks that every inverter or microinverter is reporting, verifies the inverter's grid settings match your utility's requirements, tests the rapid shutdown, and records the results.
What is left behind?
Your driveway is a free preview of your roof. A messy work site is a red flag.
A high quality contractor should:
Keep a clean and tidy work-site throughout the installation.
Ensure your eaves and gutters are cleared of debris and left cleaner than when they arrive.
Leave your landscaping in equal condition before and after the installation.
If a trench is required, bins or mats should be used to store the dirt until it is time to backfill.
Remove all packaging and garbage.
Give you a walkthrough of the work performed to show what cables were installed, how to operate the system, and use the monitoring app.
You paid a lot of money for your home, it should be treated with respect.
Frequently Asked Questions
Common questions about quality solar installations answered.
Do I need a new roof before I install solar?
If your roof has less than 10 years left, you
should replace it or get a life-extending spray.
Doing so will save you thousands of dollars
in a few years as we have to uninstall then
re-install the entire array.
What is the difference between my solar quotes?
Cheap solar can be very expensive in the end.
We regularly get called to fix faulty installations
from other contractors. Kuby uses certified
electricians, has higher quality standards than most,
and goes the extra mile to ensure it not only
functions, but looks good.
Panels are rarely the weak point. Most long-term
problems come from how the system was installed:
sealing, wiring and connections.
Can I inspect my own solar installation?
From the ground, yes. You can check wiring routes,
panel alignment and cleanup. Don't go on the roof;
ask your installer for photos of the attachments
and electrical work.
Does it matter if an installer uses subcontractors?
Not automatically. Ask who does each part of the
job and who is accountable for the workmanship.
What should I get in writing after my install?
Permit and inspection records, a layout drawing,
equipment specs, all warranties, and access
to your monitoring.
How long should a solar installation last?
Panels typically carry 30-year performance
warranties. Installation quality decides whether
the rest of the system lasts as long.
Conclusion & Next Step
Quality takes time and effort. It is easy to run cables over roof hips and eavestroughs at crooked angles. It is much harder to do it properly and be proud of the work.
From design, through installation, and monitoring for decades to come, Kuby strives to do everything with master workmanship.
We know your installation will be with you for decades to come. We will honour that investment.




.svg)
.svg)


.svg)

.svg)

.jpg)
.jpg)
.png)
(1).jpg)
.jpg)
.jpg)
.jpg)
.jpg)
.jpg)
.jpg)
.jpg)
.jpg)


.svg)
.svg)


